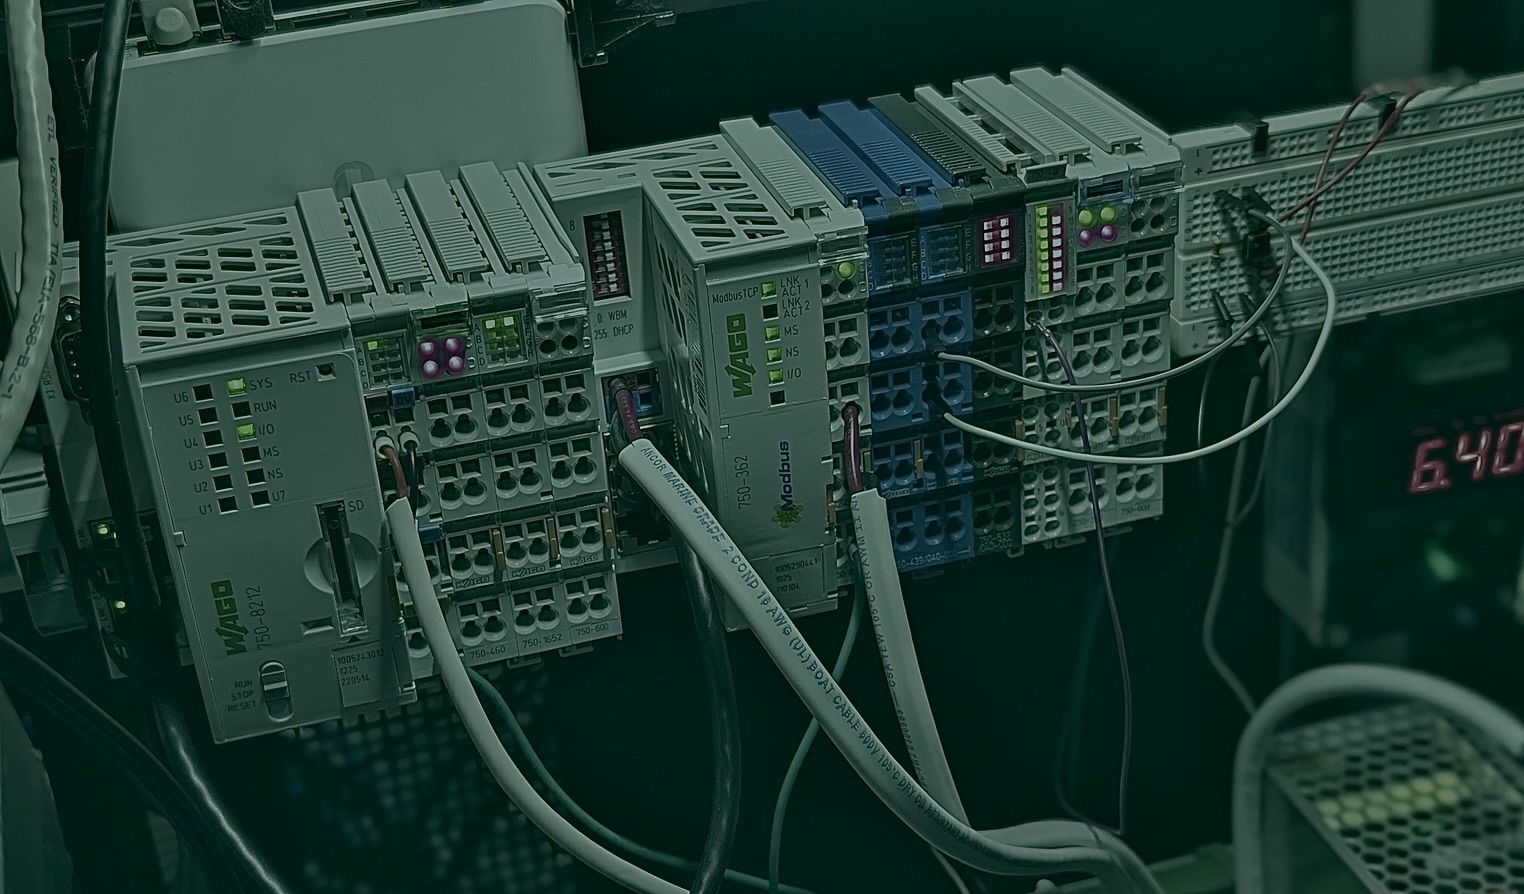
Navigating the digitized realm presents formidable challenges in integrating the Operational Technology (OT) and information technology (IT) worlds. OT systems, with PLCs, DCSs, and SCADA systems are highly complex, which increases the difficulty of tasks such as deploying firmware updates and managing device controls such as controlling the OT/ IT infrastructure during a cyber security attack and air gapping. The nuanced requirements and diverse infrastructures demand sophisticated solutions. Amidst these challenges, Portainer's advanced capabilities of Edge Configuration and Edge Stacks can be leveraged for real outcomes. Its edge features offer a promising avenue for streamlining OT network deployment and management, potentially transforming cumbersome processes into efficient and seamless operations.
The following steps guide you to how easily you can onboard multiple edge devices efficiently using Portainer. Later you can also deploy a PLC program developed in the Codesys IDE using Portainer to a fleet of PLCs without using a USB-C or Ethernet cable to the device. For this demo, we are using Wago CC100 PLCs as edge devices.
Step 1: Creating an Auto Onboarding Script from Portainer Server
As a first step, we onboard our edge devices onto the server. Portainer’s Auto Onboarding feature is capable of onboarding large numbers of edge devices to a single server. Fig.1 shows the architecture of connectivity from edge devices to a server.
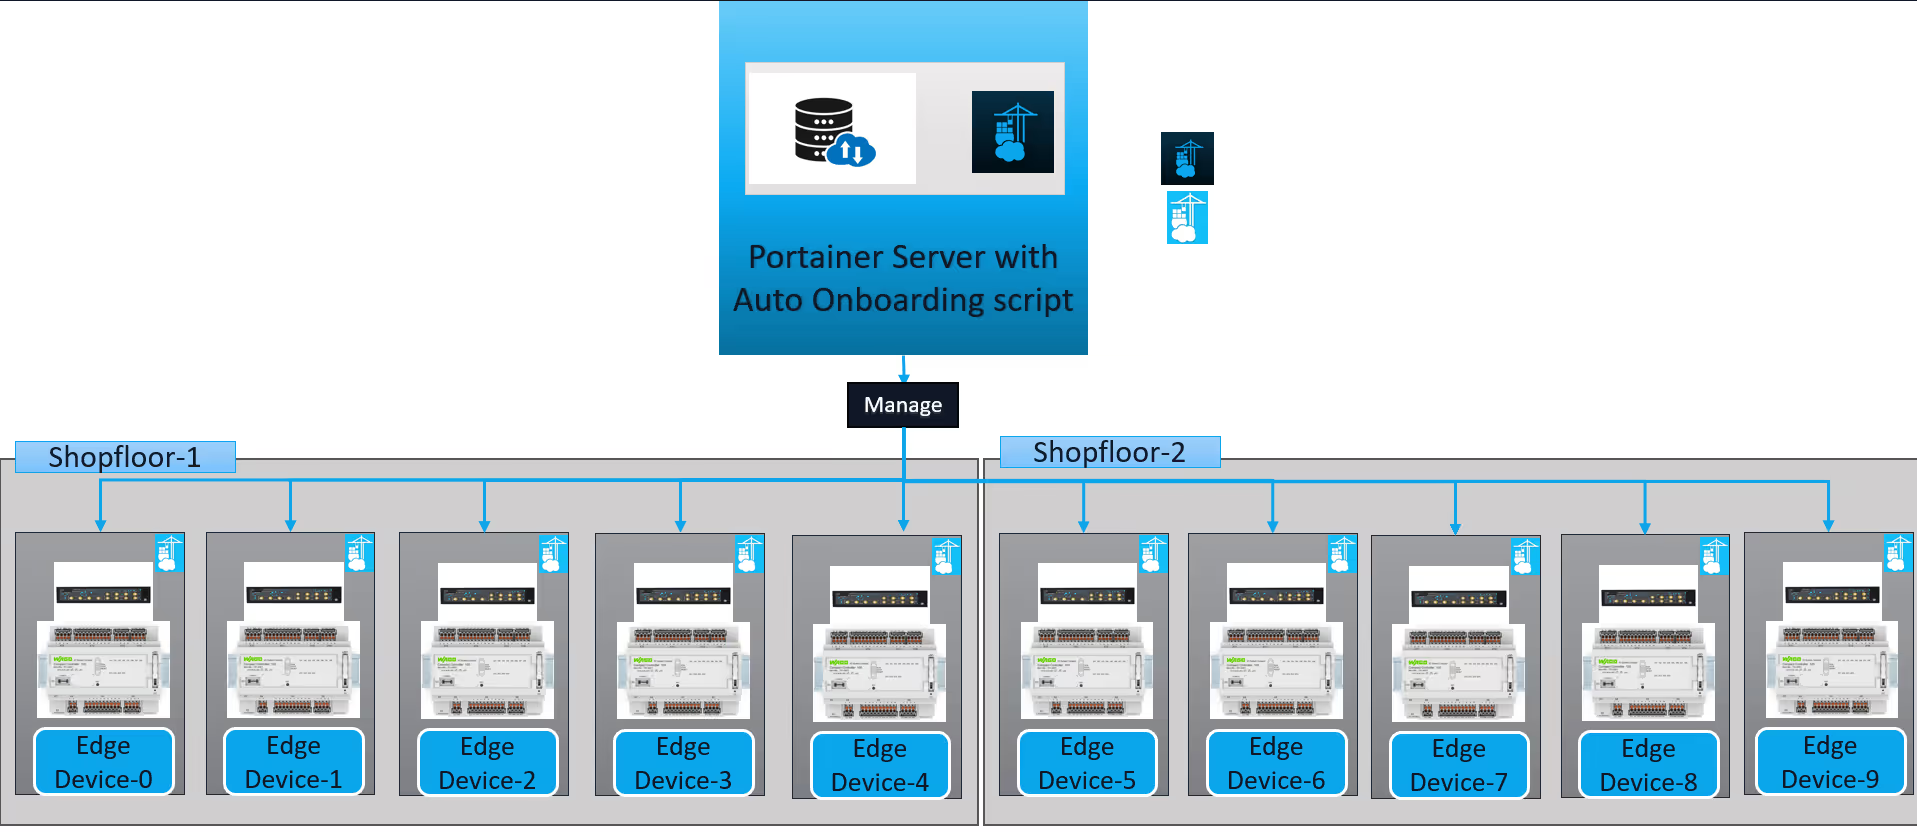
Fig.1: Architecture of Portainer Server and Edge Devices for Auto Onboarding
To create the auto onboarding script in Portainer, navigate to the environment page of the Portainer server and click on the "Auto Onboarding" button. Set the agent to "Edge Agent Standard." The server details will be filled in automatically. Next, assign the remaining fields, such as Groups (for role-based access), Edge Groups, and Tags, to manage access. Provide an Edge ID generator function (e.g. uuidgen) so that Portainer can assign an identity within the Portainer platform. The edge ID generator retrieves the given identifier from the edge machine and assigns the corresponding name in the Portainer server as shown in figure 2 below.
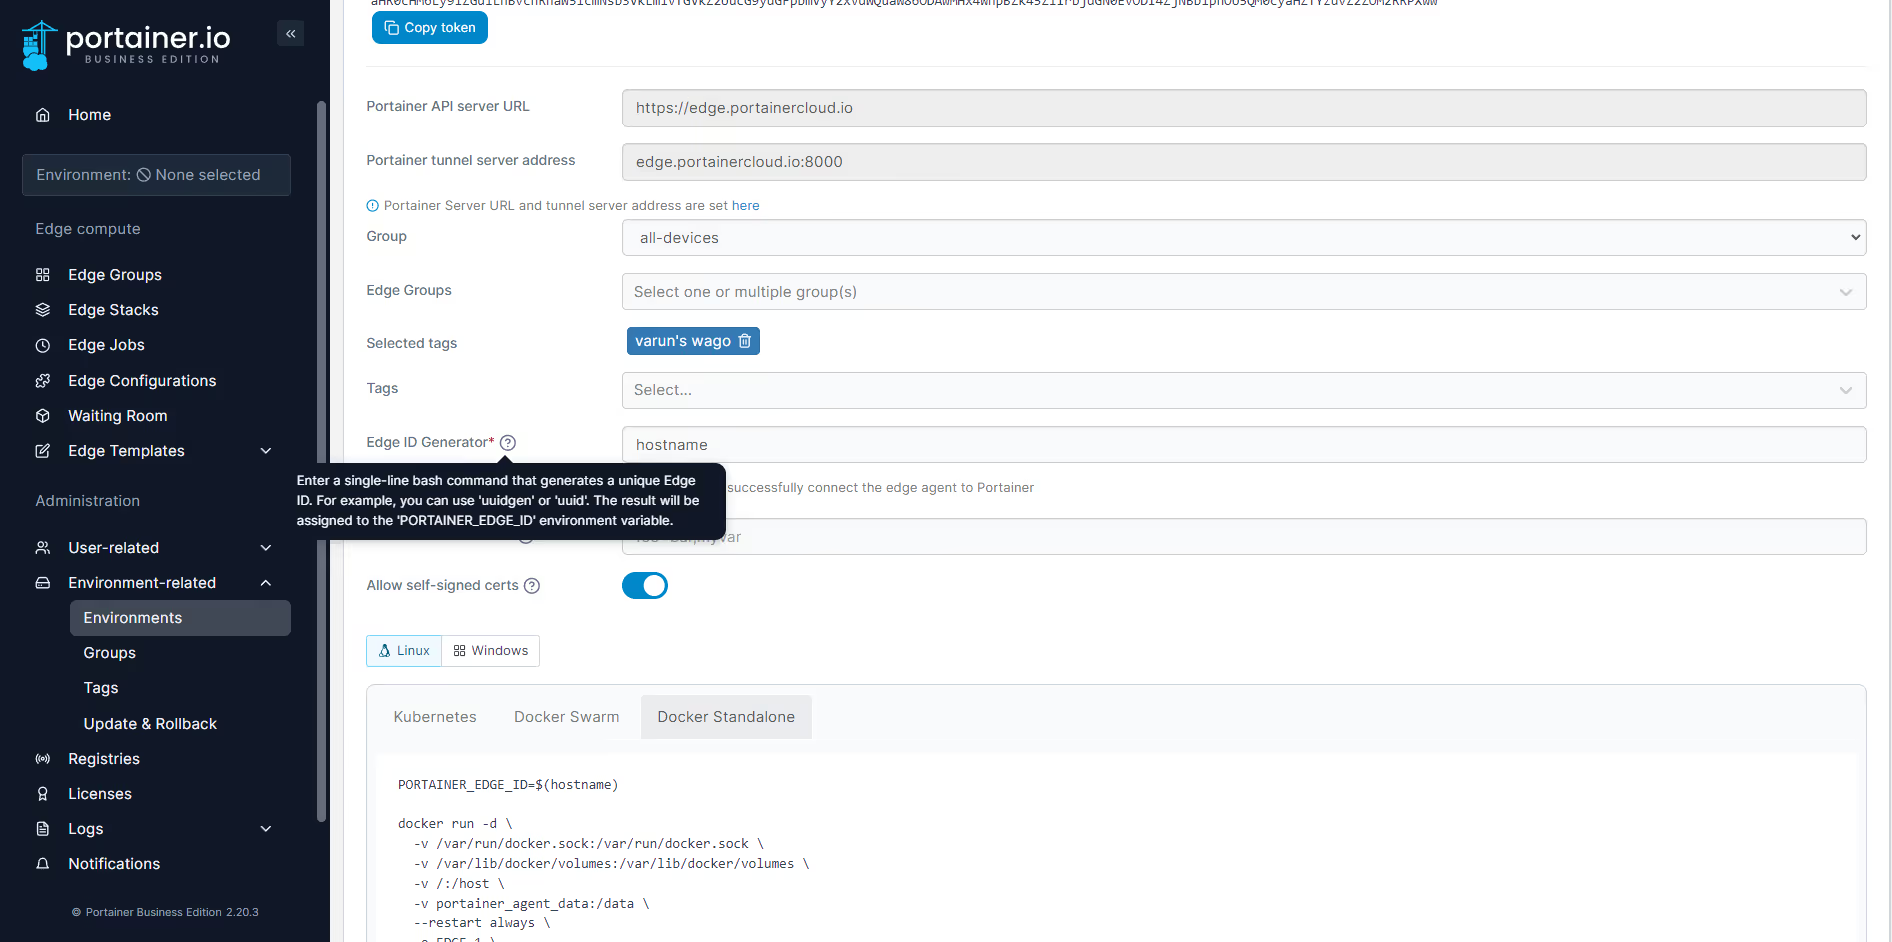
Fig.2: Auto Onboarding Script generation
The Portainer server then generates an auto-onboarding script. This script is general for all new devices and can be deployed on each edge device via the CLI or other provisioning tools. Each device must have Docker installed as a prerequisite (WAGO Devices are delivered with Docker installed). Upon successful execution of the script, the edge devices are effectively onboarded to the "waiting room." Once the devices are in the waiting room, you can associate them with the dedicated edge group to complete the onboarding process as seen in the figure 3 below. The edge devices will then be visible as online on the homepage.
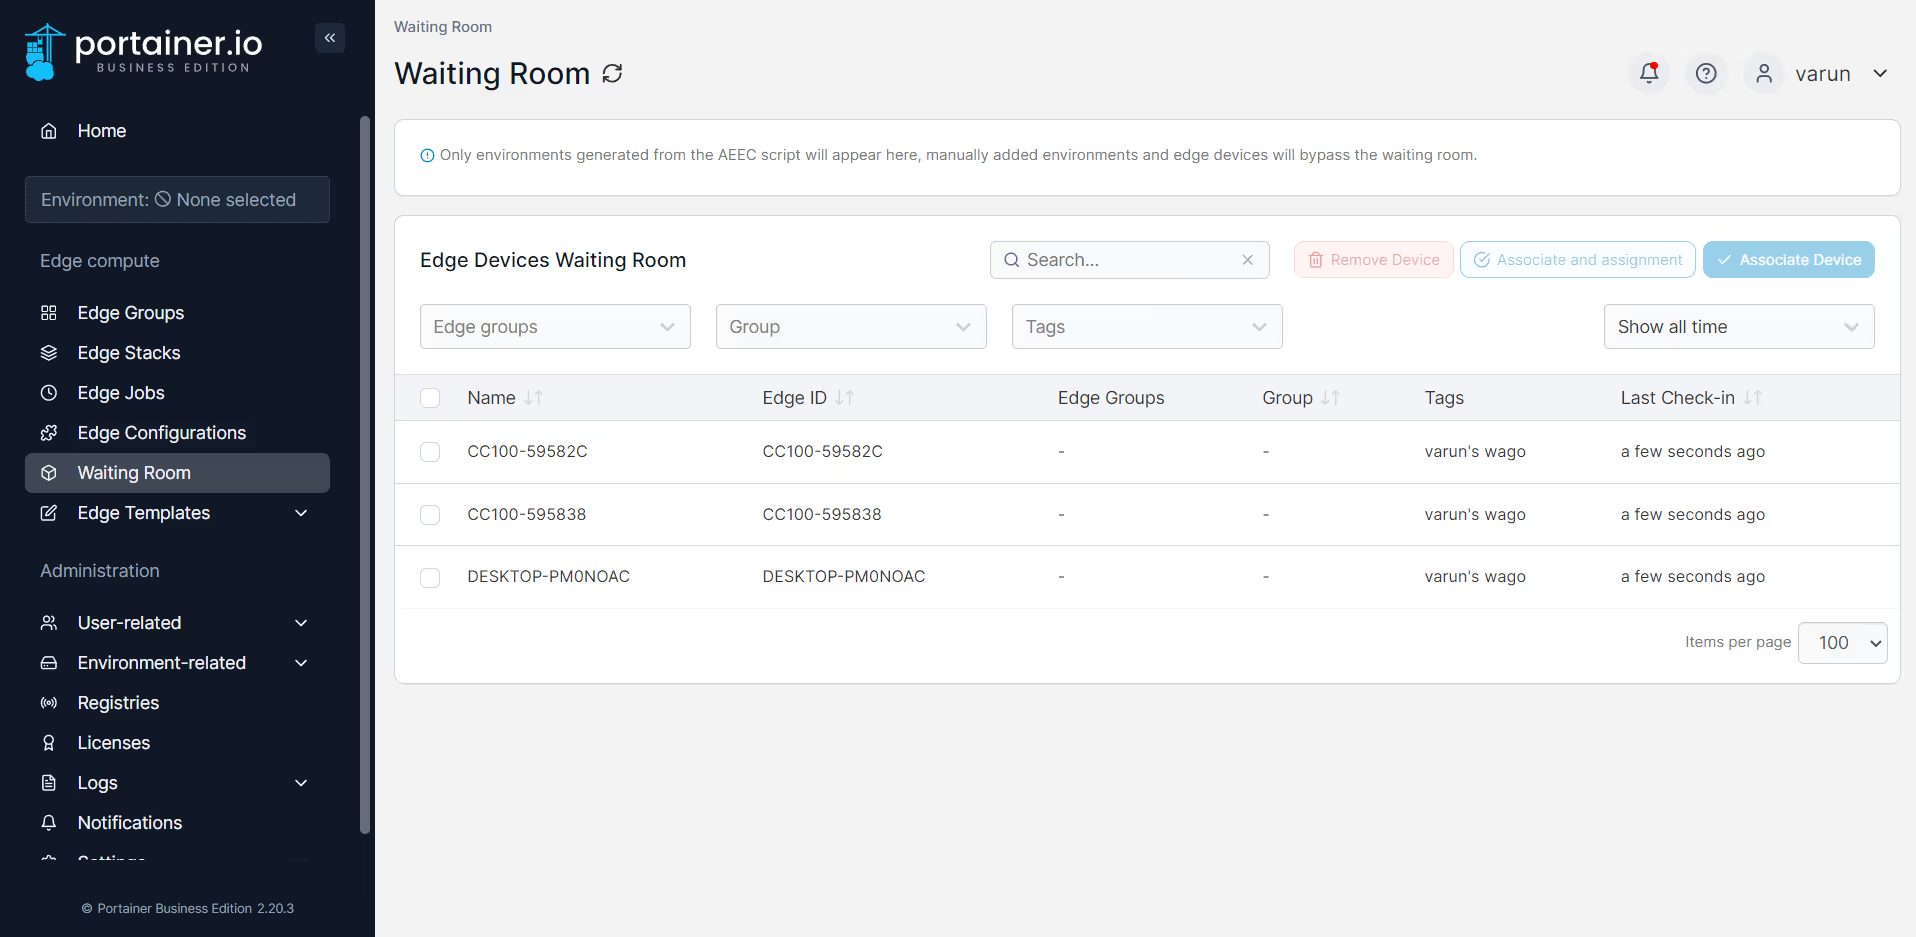
Fig.3: Waiting Room on the Portainer server
After deploying the auto-onboarding script on the edge machine, you will observe that the edge devices appear in the waiting room. At this point, you will need to assign these devices to designated edge groups or apply appropriate tags to systematically organize them. This will ensure they are successfully onboarded to the Portainer server.
Step 2: Creation of Boot file from Codesys PLC Program
CODESYS IDE is used to develop PLC code using a ladder diagram, which can then be traditionally deployed on edge devices or directly to a PLC using a USB-C cable. After creating a CODESYS program to control the WAGO CC100 PLC and testing it in the CODESYS runtime environment, you must create the boot application of the file as seen in the figure 4below. A boot application file (.app) will be generated in the respective folder. This file needs to be deployed on the edge device to make the PLC operational. The program's operation in this example is to blink the LEDs on the PLC. There are three different programs to perform this operation using different frequencies. In this setup, we are using three PLCs.
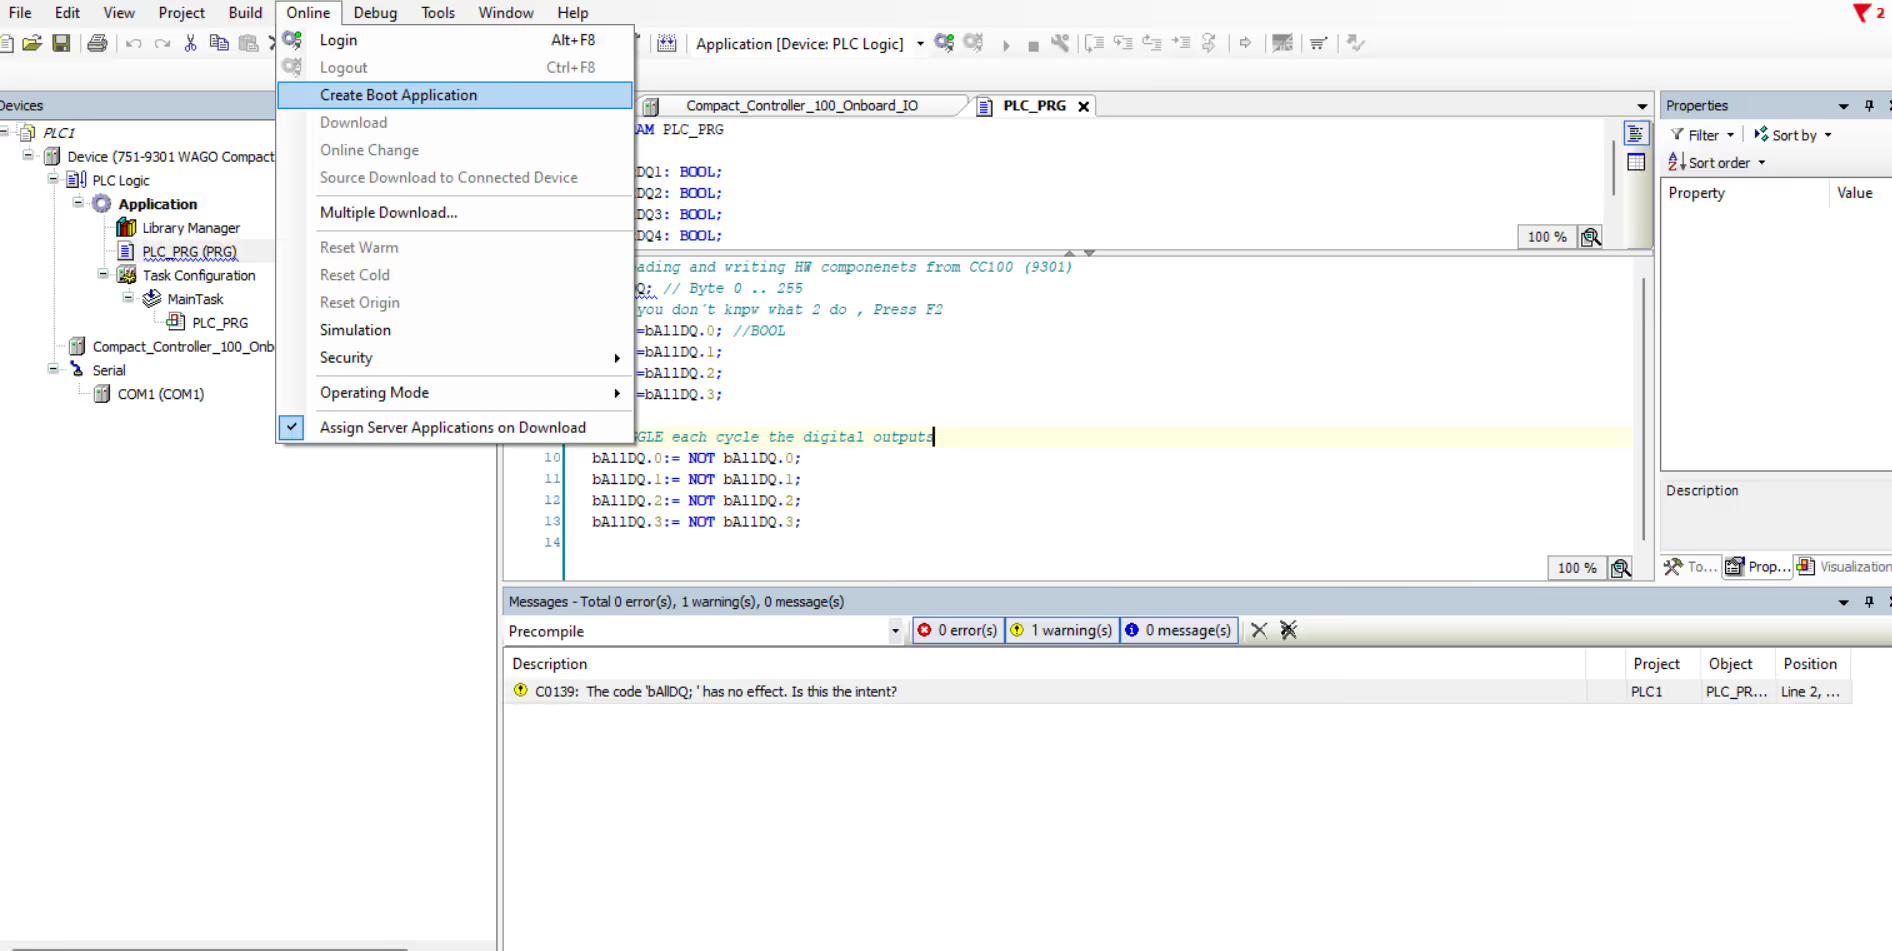
Fig.4: Codesys IDE UI to create Boot Application
Step 3: Boot file transfer using Edge Configurations
In this method, the objective is to transfer the boot files (.app and. crc) to the PLCs in an existing codesys runtime environment. This operation is carried out using the Edge Configuration feature. Navigate to the "Edge Configurations" page on the Portainer platform, add a new Edge Configuration, and you will be prompted to fill in the details, as shown in Figure 5 below.
Fill in details such as the name of the edge configuration, the edge group your edge devices belong to, and the directory on the edge devices where you want to deploy the boot file. In our case, we are deploying a device-specific edge configuration, so we select this option and proceed to match it with the specific Portainer Edge ID, which each edge device is assigned. You can find the Edge ID navigating to the environments in the “Environments” panel on the left-hand side and clicking on the environment names (the ID is located at the top of those pages). Finally, upload the boot file and click on "Create configuration and push" to deploy the .app boot file to the PLCs. The boot application has been transferred to the device.
Please note that you must deploy the boot files (.app and .crc files) in “/home/codesys_root/Plclogic/Application” directory so that it will get transferred to the container file system with the help of docker compose later.
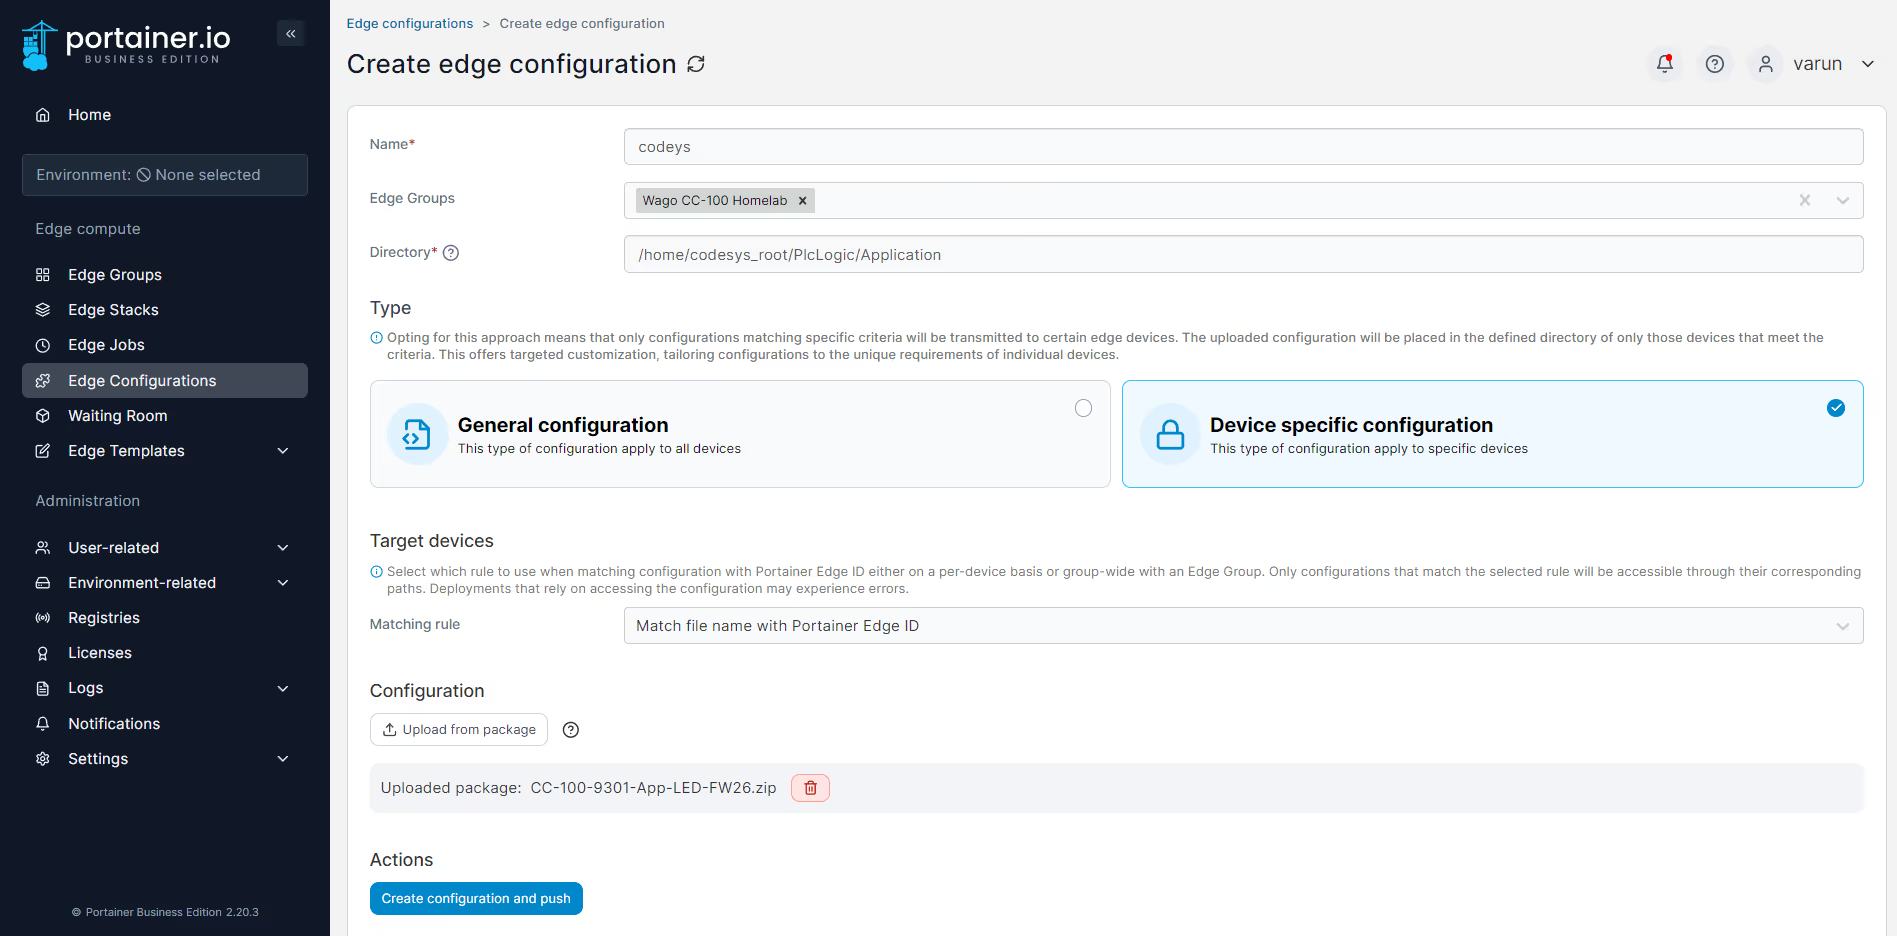
Fig.5: Portainer UI showing the Edge Configurations
Once the boot files are present in the host file system which is transferred using edge configuration, we then go on to creating the codesys runtime container using the edge stacks in next step.
Step 4: Creation of Edge Stacks for Codesys container runtime
In this paragraph we make sure, the boot files (.app and. crc) are in the host file system of the Wago PLC which was transferred using edge configuration, located in the “/home/codesys_root/Plclogic/Application” directory. The below docker compose file starts the codesys container with an image provided along with picking the boot files from host file system to container file system. Below figure 6 shows the docker-compose.yml file which explains in detail about the image, volumes and other details related to spinning the codesys runtime container.
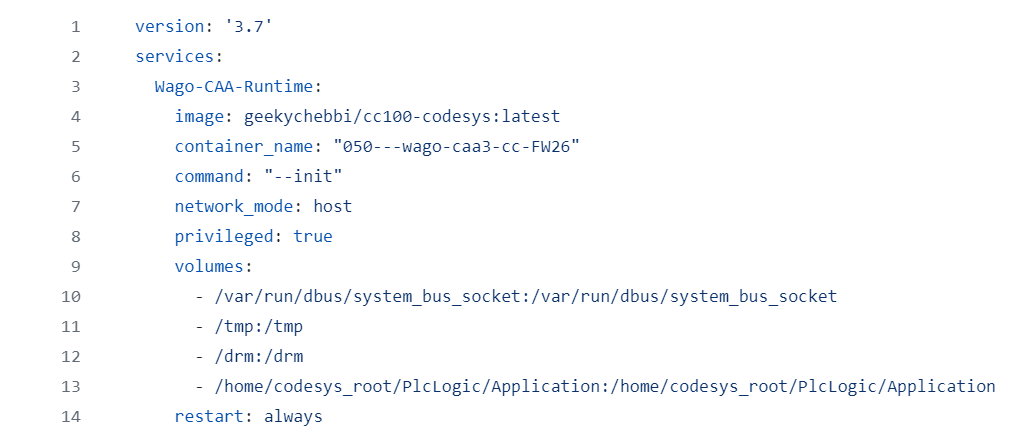
Figure 6: Git repository for docker compose file deployment of Codesys runtime container
To ensure the proper functioning of your application, it is crucial to place the different boot files in their respective directories as specified. In this example, we have considered three application boot files for three PLCs. The Docker Compose configuration will automatically pick up these files and spin up the containers using the specified image on all the edge devices in the edge group.
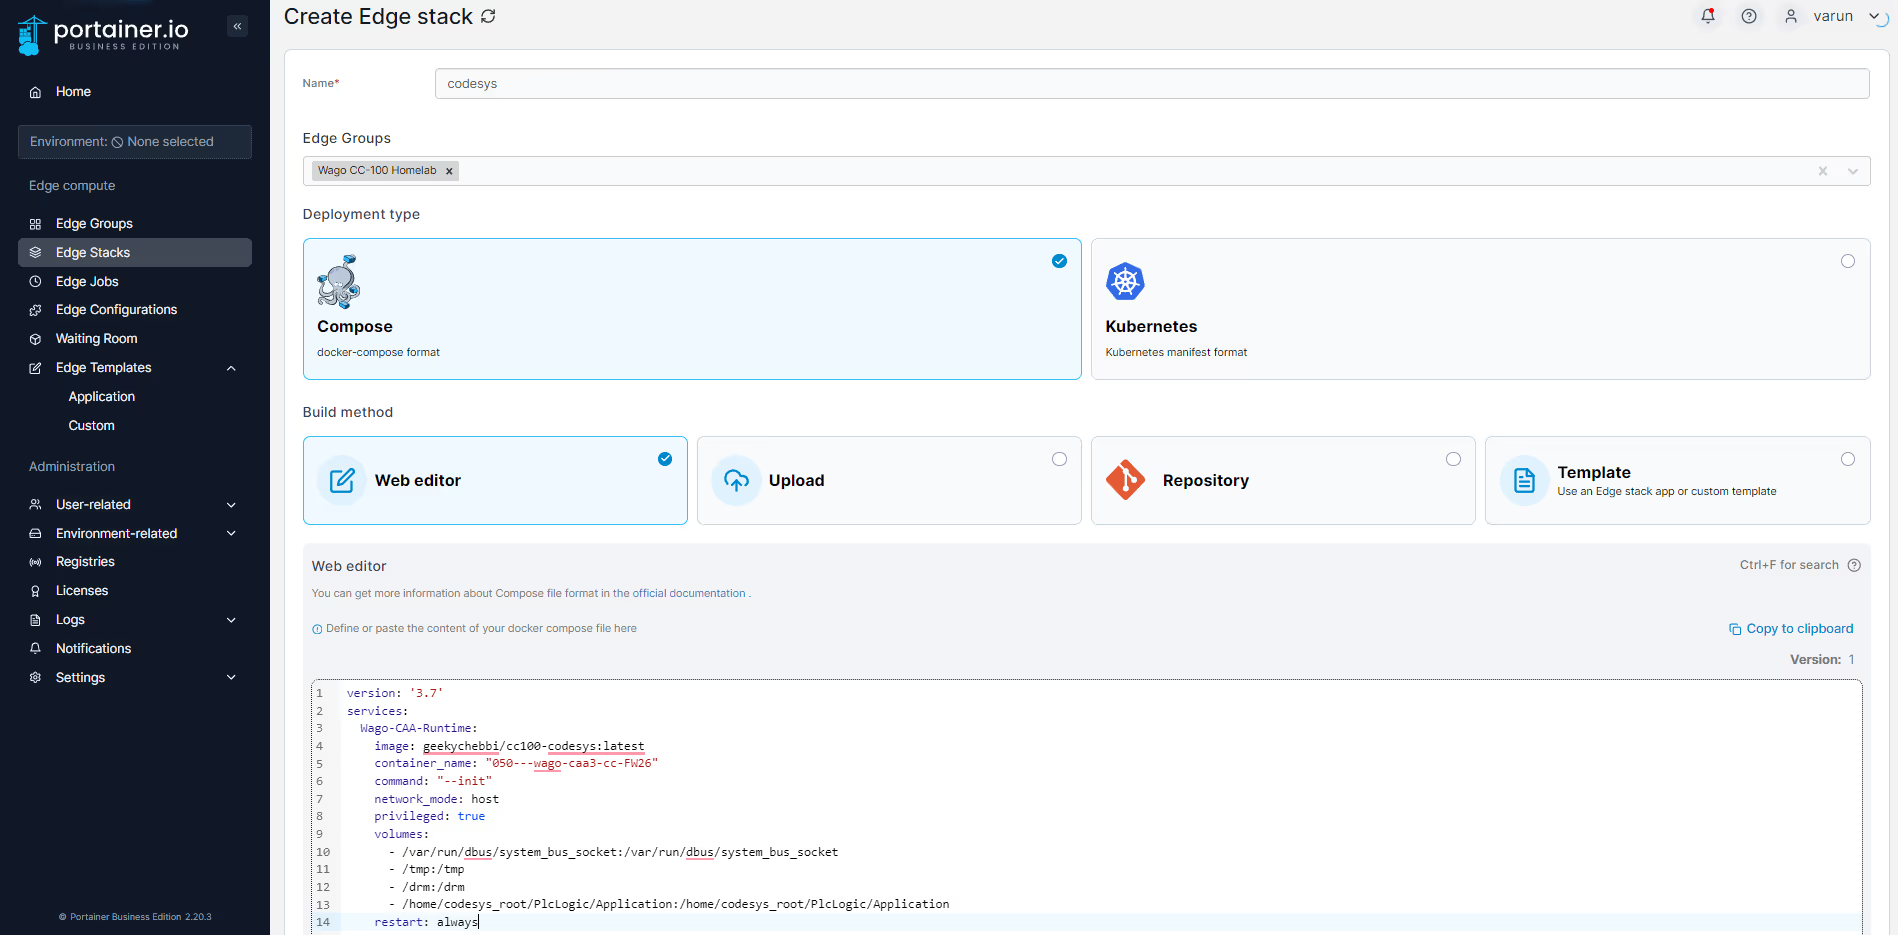
Figure 7: Stack creation and deployment for a single edge device
After clicking on "Add Stack," you'll need to name your stack and paste the contents of the docker-compose.yml file into the web editor, as shown in Figure 7 above. Using this file will help you deploy a stack on a PLC with ease. Once you place the docker-compose.yml file contents to the web editor, you can click on “Deploy Stack”, then you will observe in the container tab that a new container is created which is named after “wago-caa3-cc-FW26” as you can see in the figure 8 below.
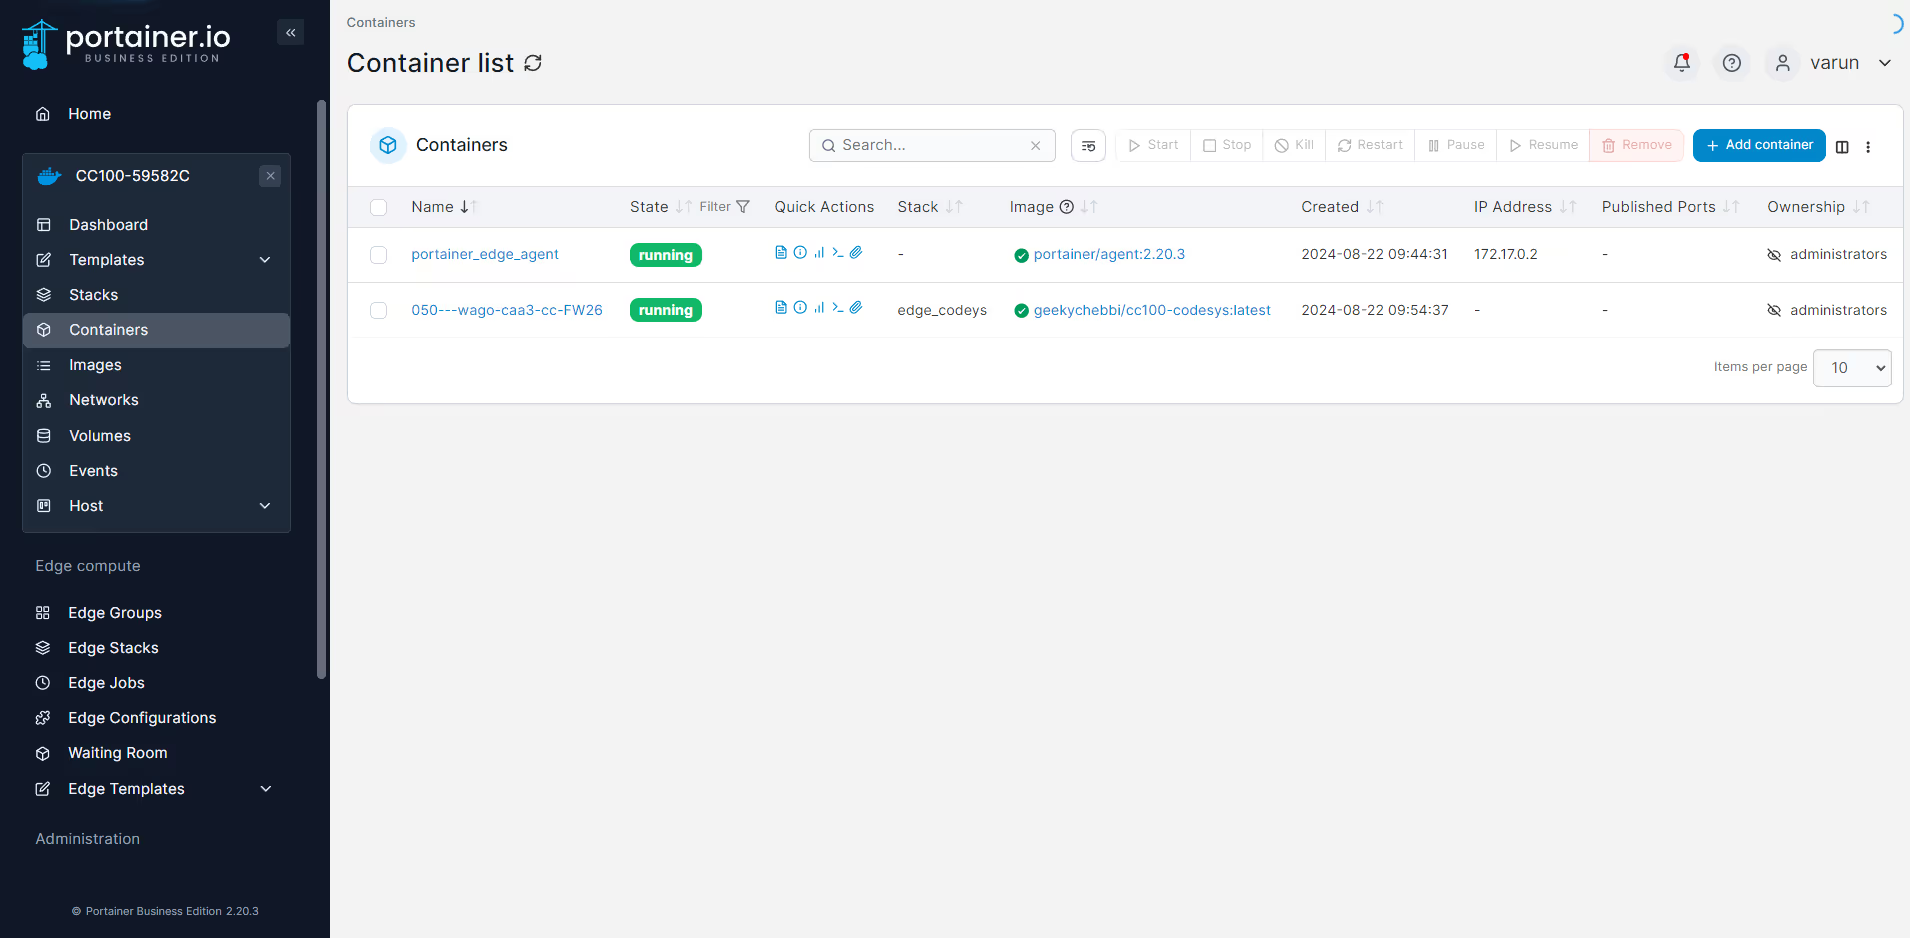
Figure 8: List of containers running the edge device
Once the container is successfully running you will see the PLC operational according to the codesys IDE code developed to perform operations. In this example we have developed a program which blinks the LED lights on the PLC. The below figure 9 shows the architectural view of what was achieved here and figure 10 shows the operational view of PLC’s lights blinking.
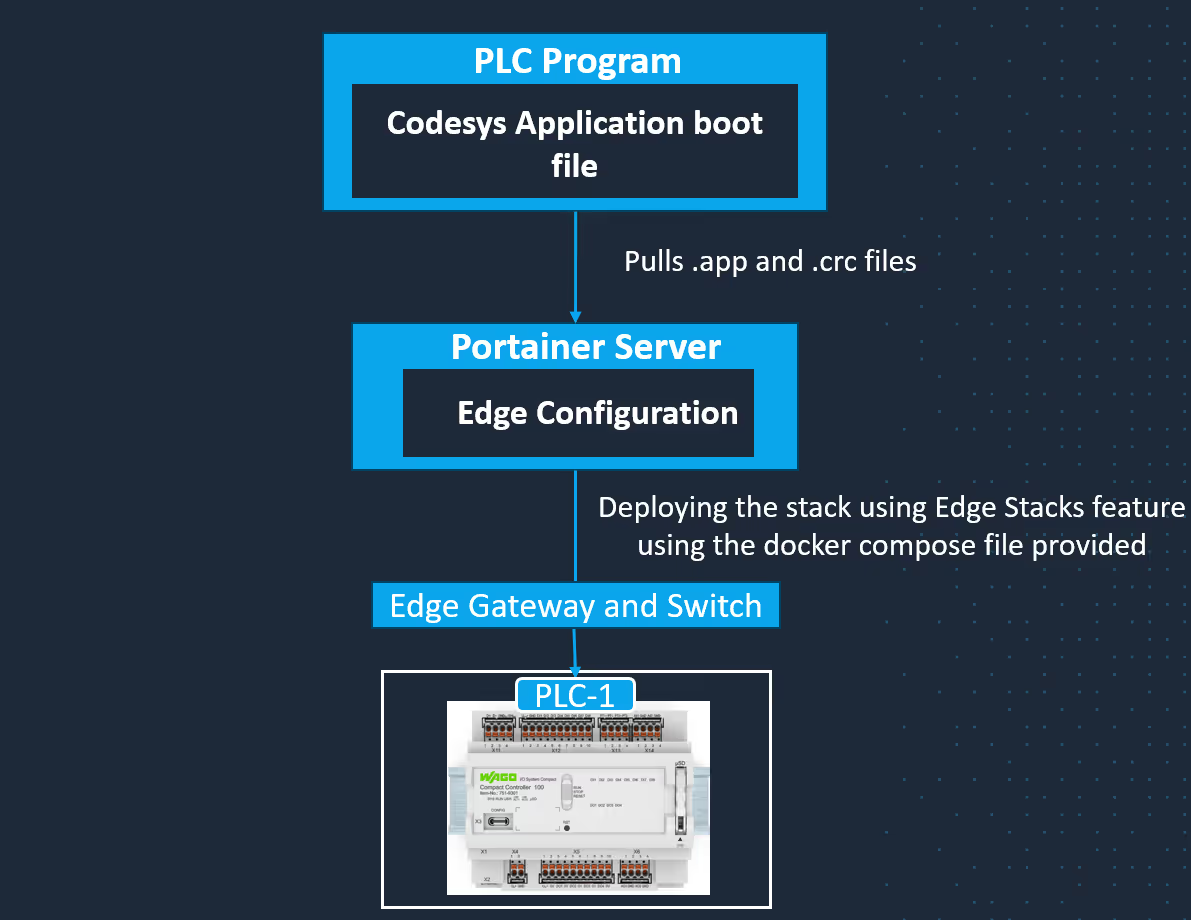
Figure 9: Architecture of stack deployment on PLC for Codesys Runtime Containers
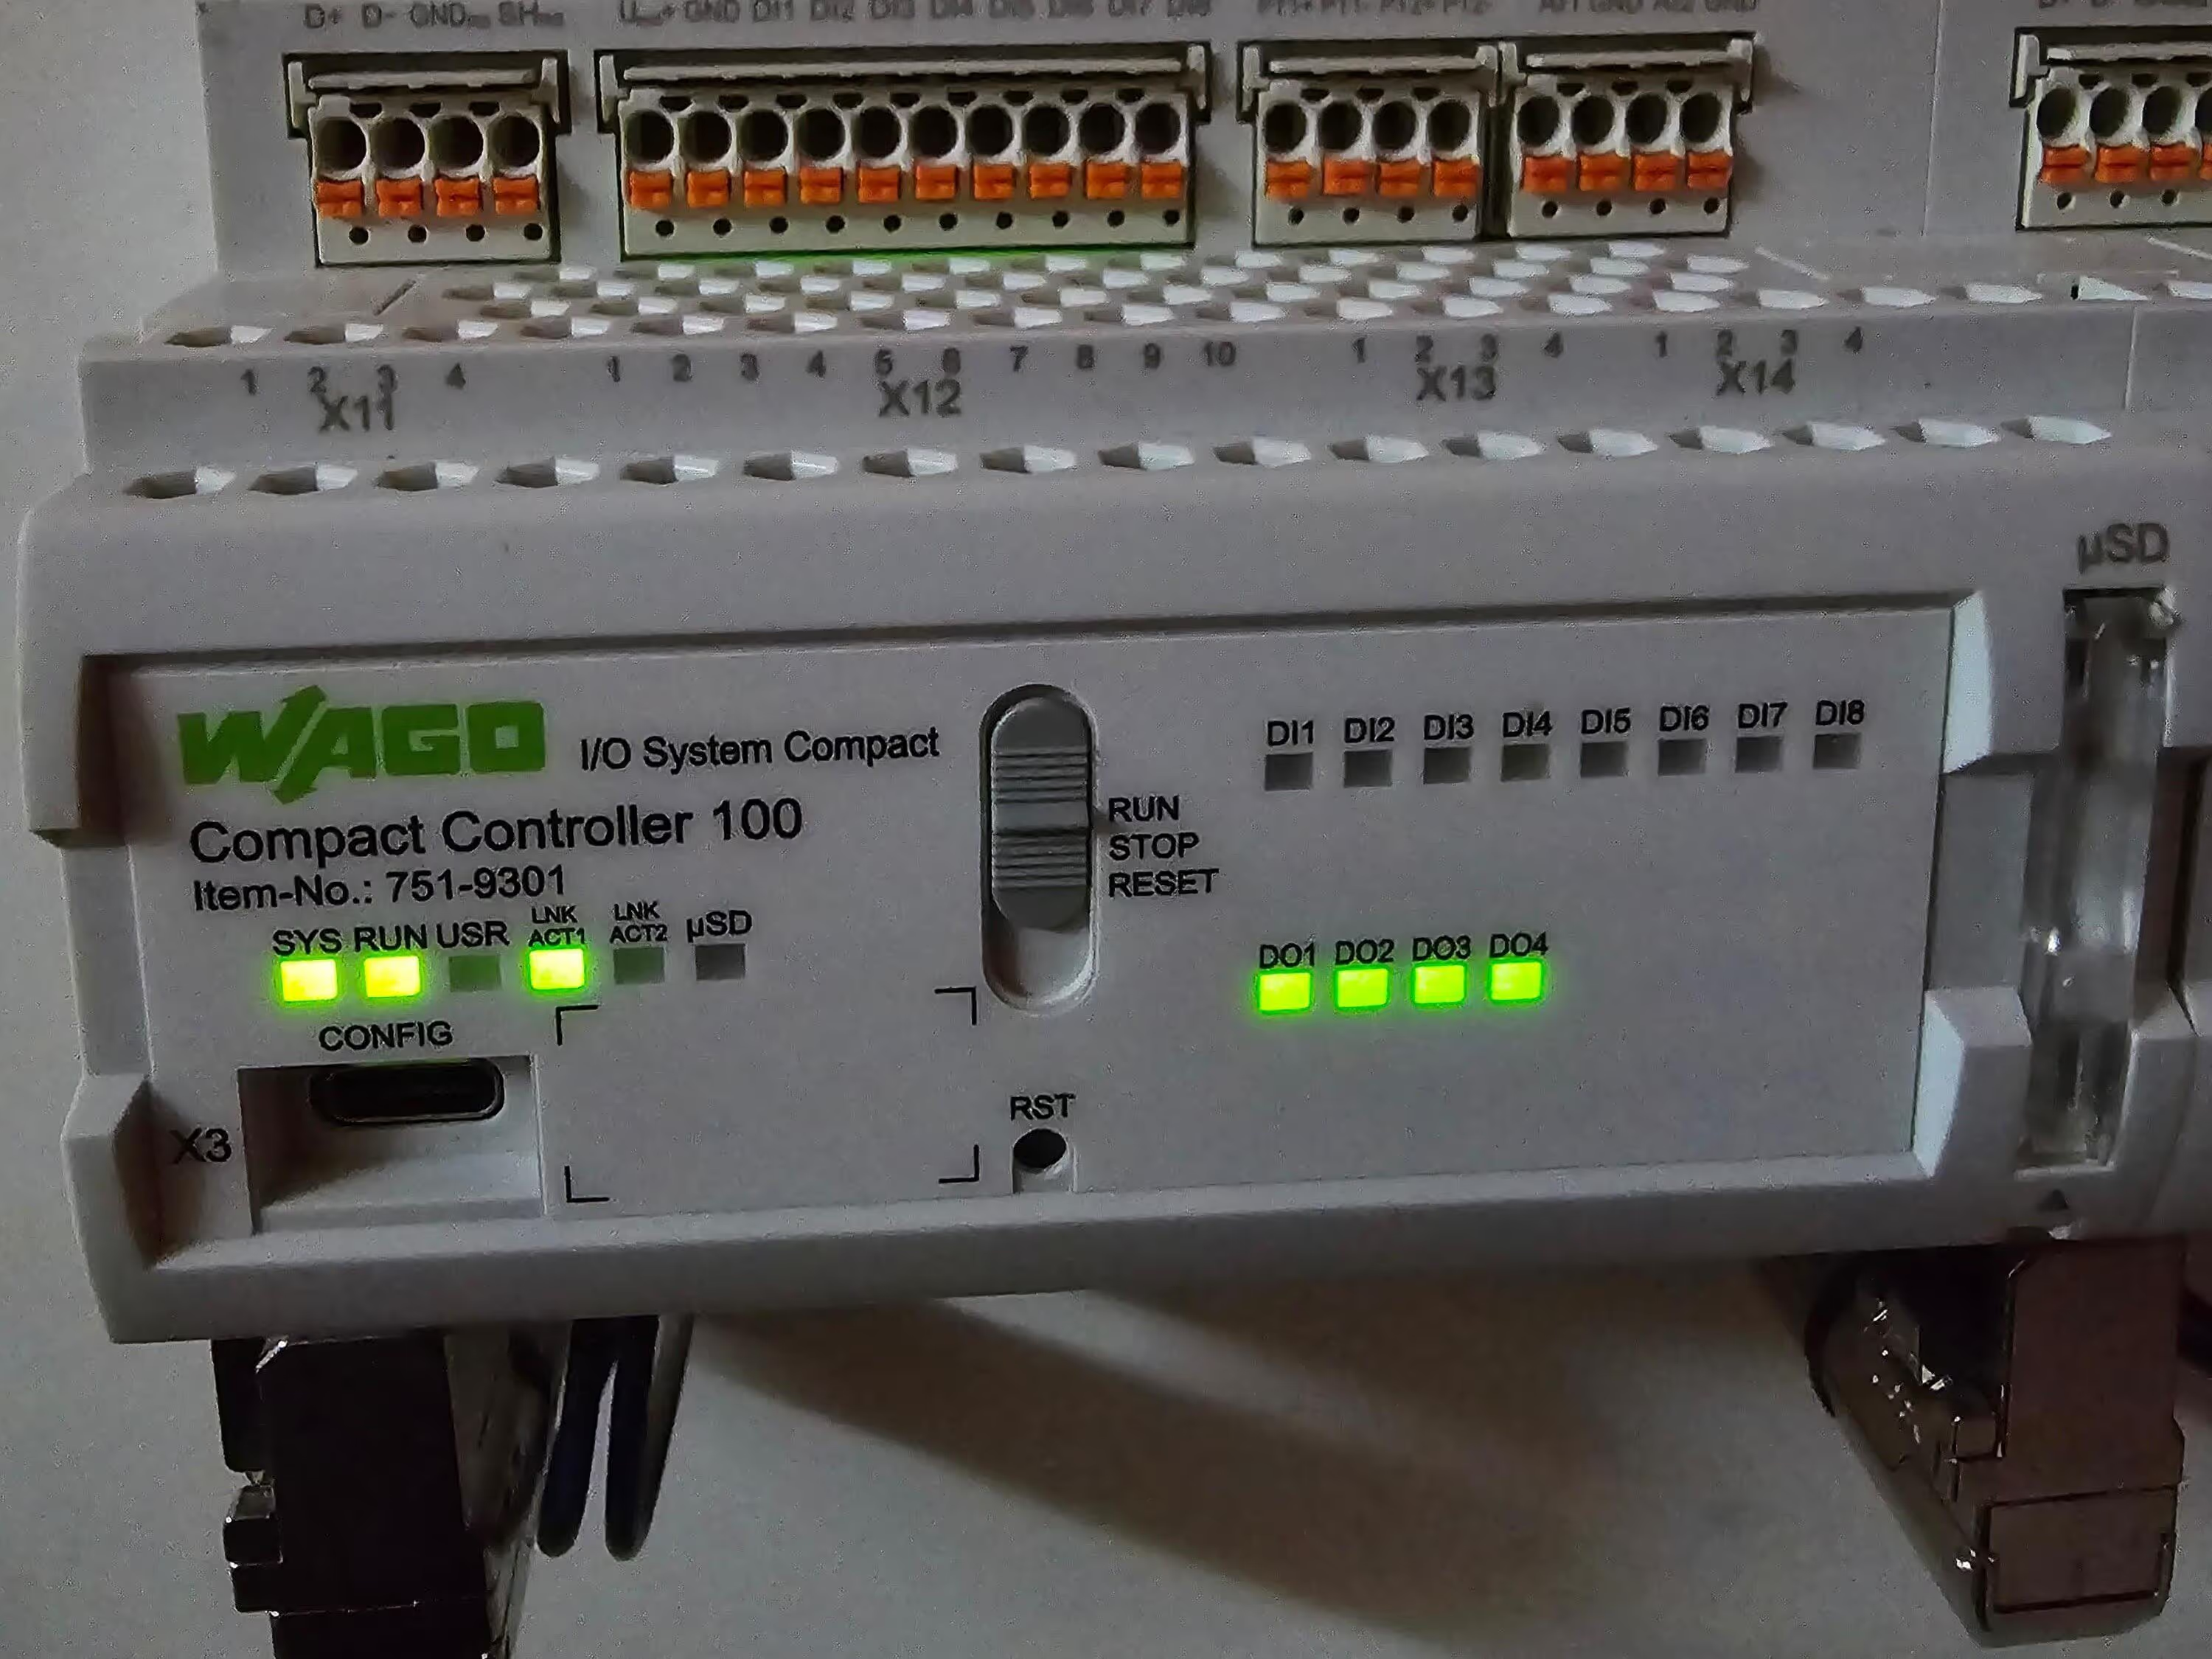
Figure 10: Operational view of PLC’s LED lights blinking
This approach allows non-IT experts to avoid using the CLI and USB-C cables for file transfers by utilizing Edge Configuration. The docker-compose.yml file enables the deployment of stacks and the running of containers, allowing you to deploy boot files and manage containers on a single PLC.
Stay tuned for our next blog post, where we'll explore how to eliminate edge configurations and entirely use Edge Stacks to perform the transfer of the application and the Codesys runtime container with a mass deployment approach. With GitOps, developers will be able to deploy applications directly by connecting their Codesys program files to a Git repository.
Git Repository: https://github.com/chebbs/codesys-1st-Appraoch.git
Feel free to contact me to understand the detailed technicalities, I would be happy to get you equipped with Portainer for codesys application deployment directly onto the edge devices.


